How to create an inset in an image magnifying an area of interest
Have you ever wondered how you can highlight a small area of interest within an image and keep the original area as a reference in the image? Wonder no further because below is a picture guide showing you just how to do this. Once you have the principal worked out then you can do many things such as bring the magnified area outside of the main image, or make the inset image more magnified......
|
|
In this tutorial you will learn how to use Photoshop in order to create a magnified insert of an area of interest on the image itself. It uses a combination of layers and the transform tool to bring an area of interest to life.
The essentials are Photoshop CS2 or above that has the ability to use layers.
The essentials are Photoshop CS2 or above that has the ability to use layers.
|
If you prefer to download the guide so you can print it, you can do so here.
|
| ||
Alternatively I've made a YouTube video for this .....
For starters
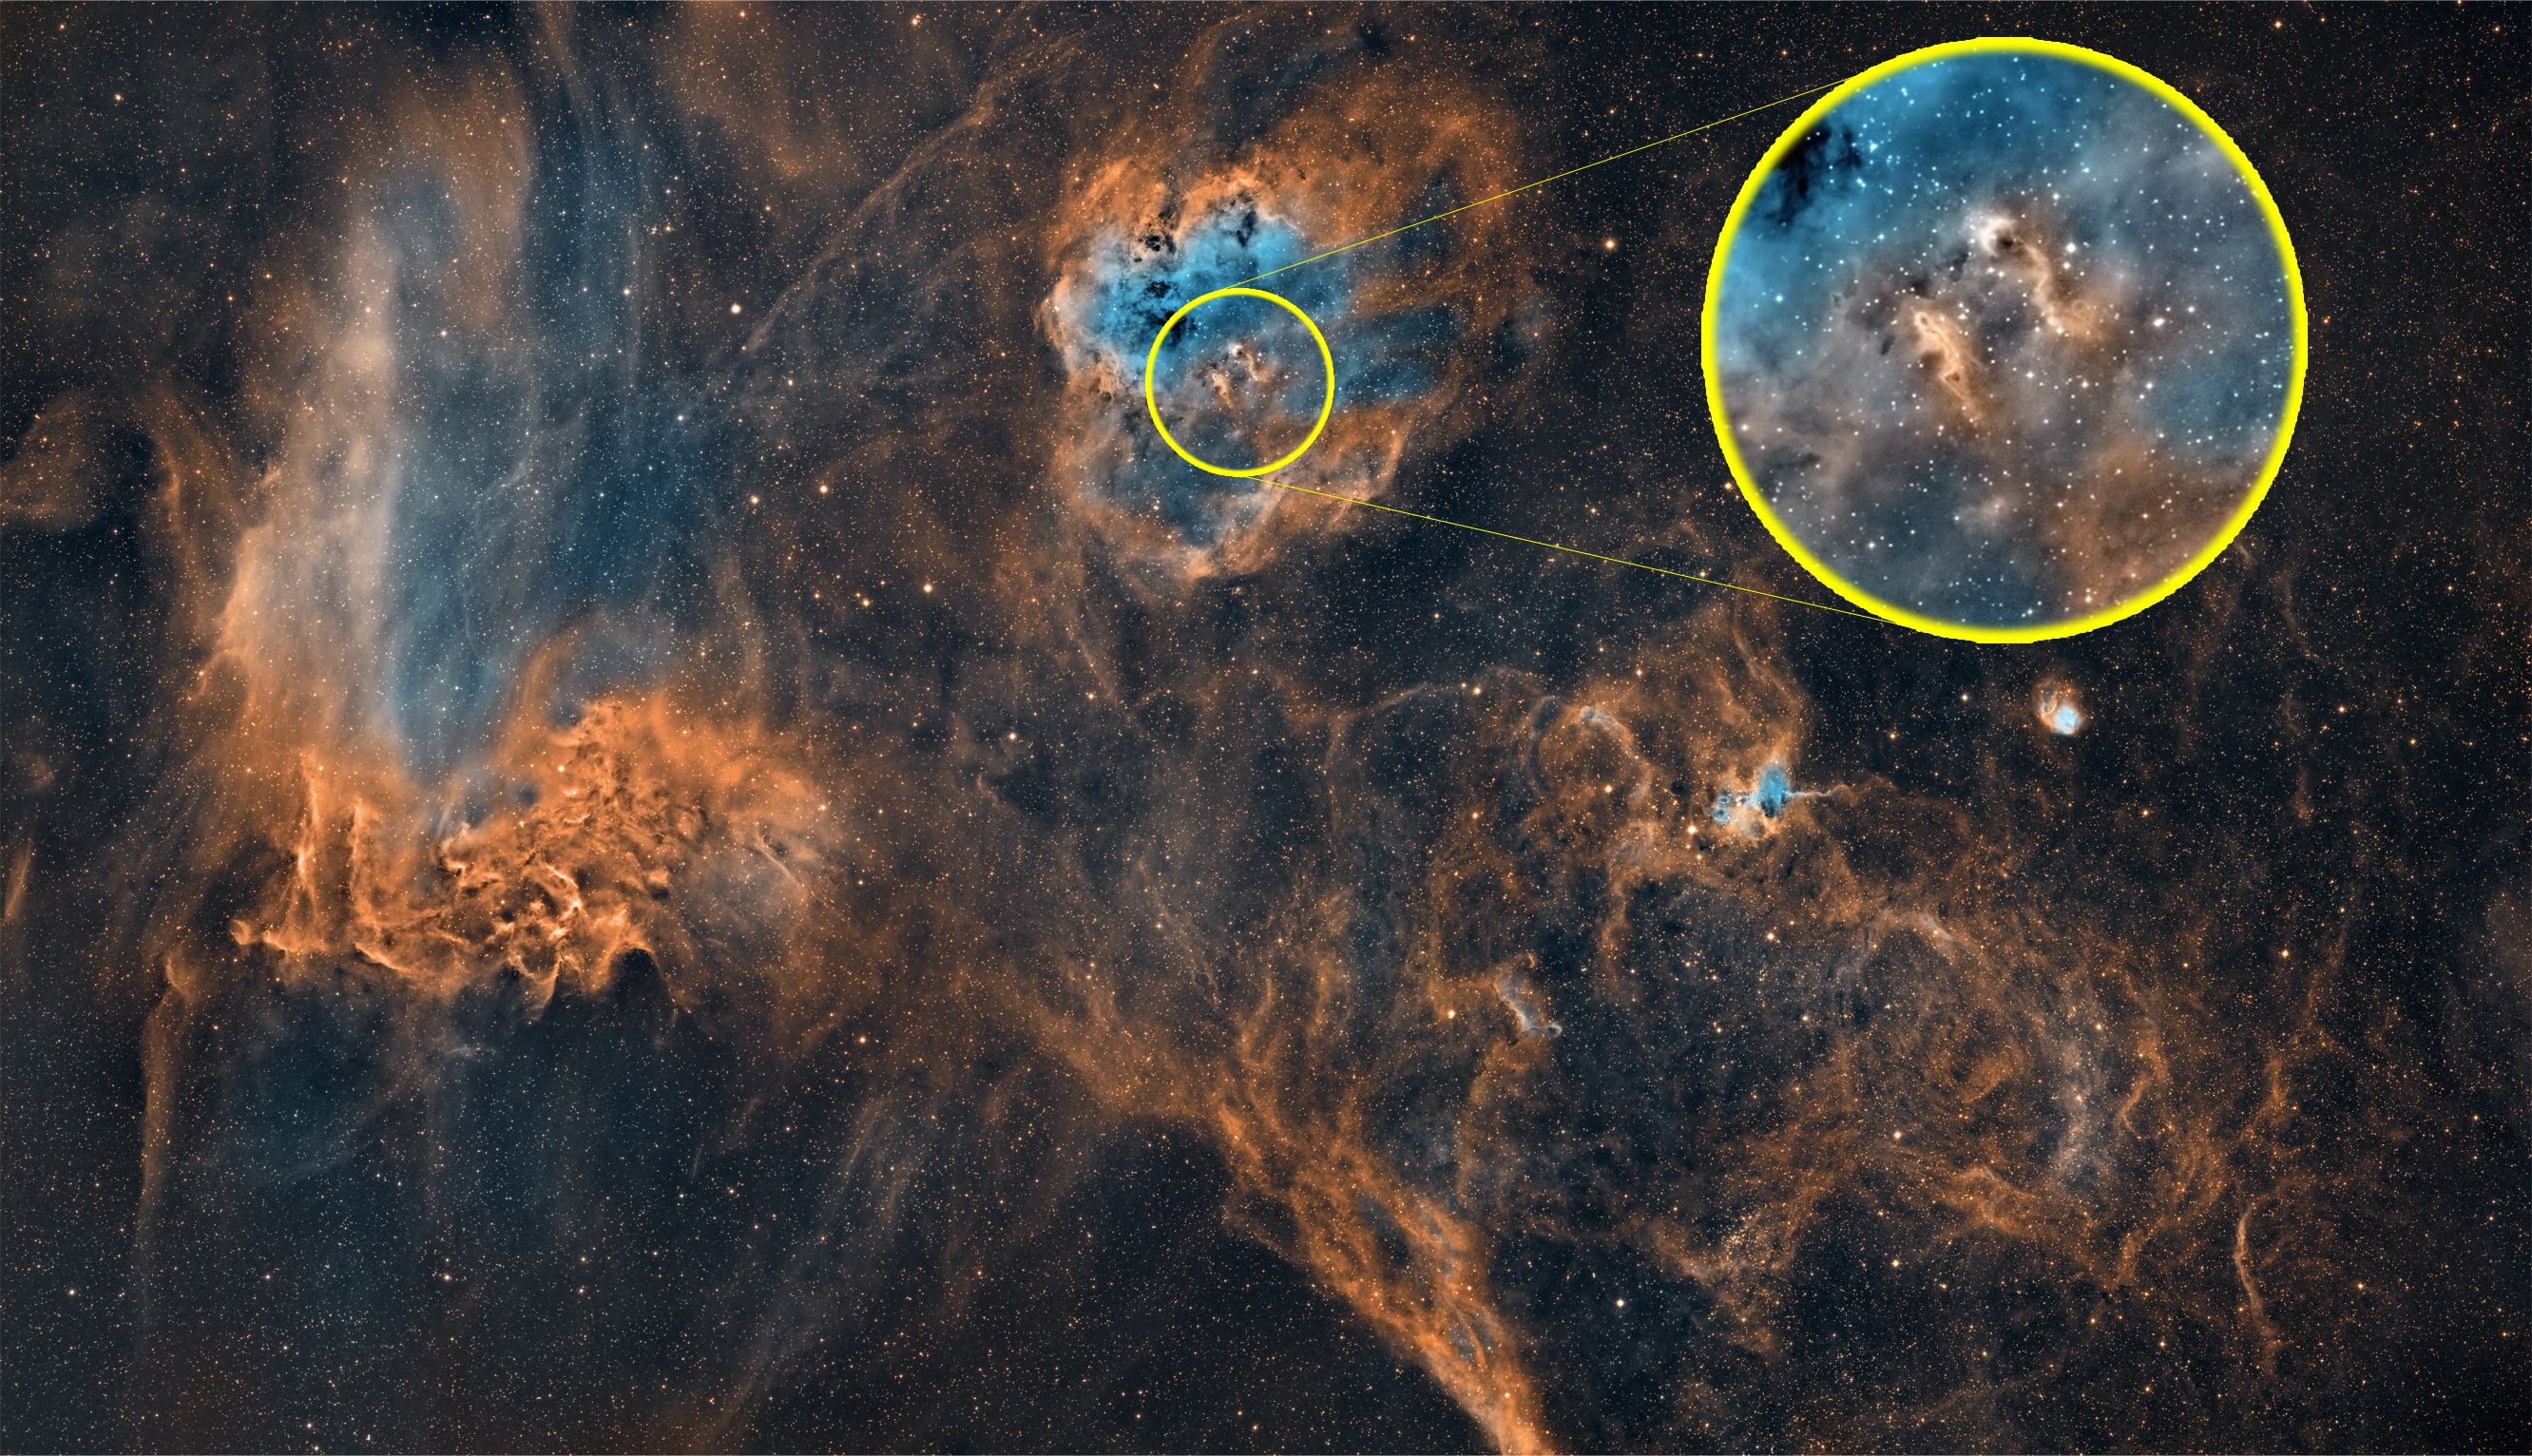
Before you start, you will benefit greatly from having a decent high resolution image of the general area you are interested in. In this example I will use the 2 pane mosaic of NGC7822 and the very small and faint Abell 1 Planetary nebula that I noticed in the frame and I wanted to show its location as well as give an indication of how small it was.
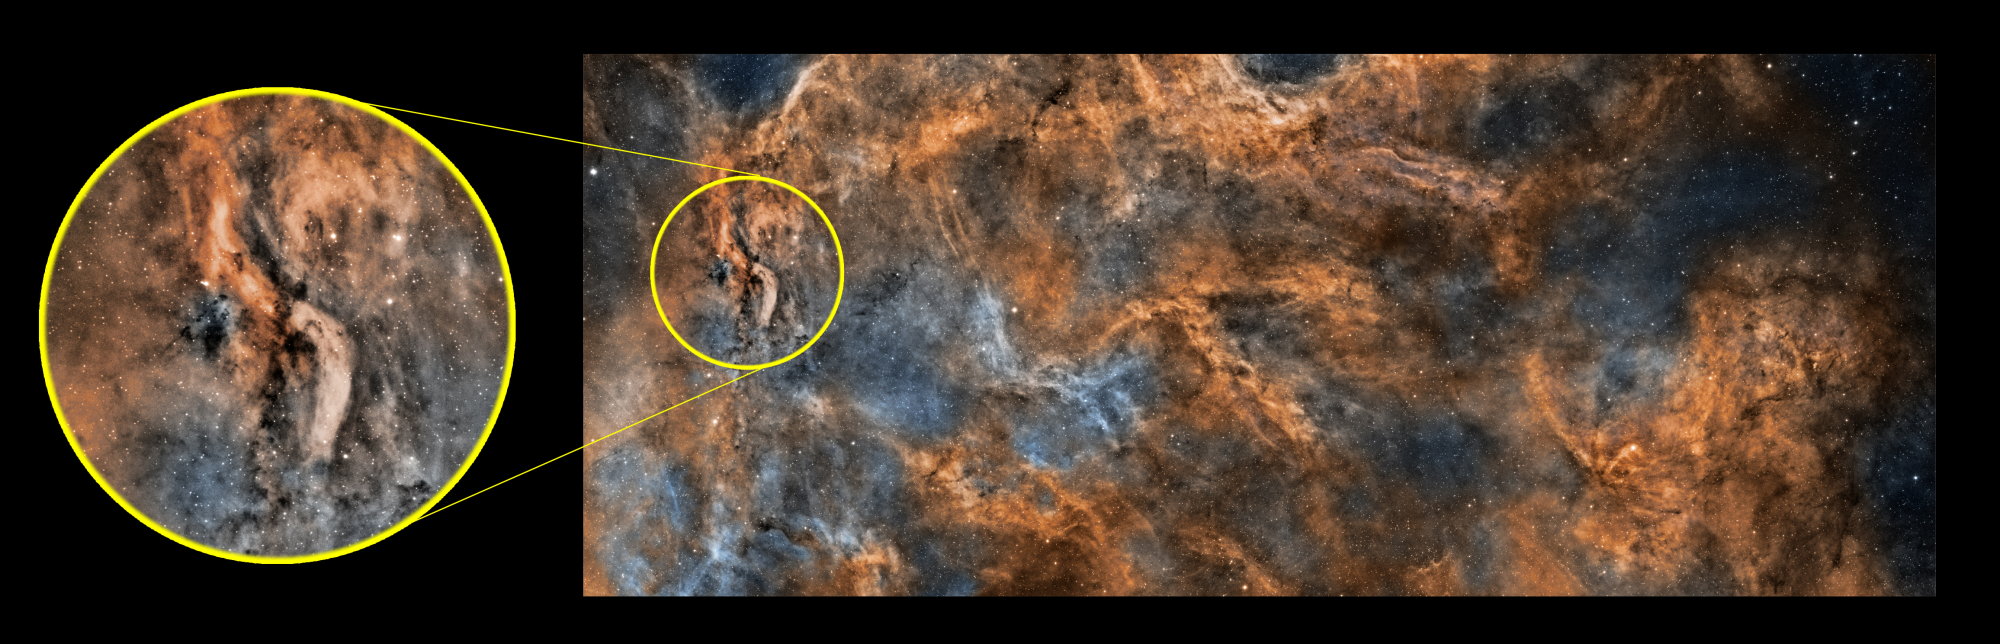
Also above is an example of how I have highlighted the Tadpoles specifically within a wide field area containing a considerable number of areas of interest.
Also above is an example of how I have highlighted the Tadpoles specifically within a wide field area containing a considerable number of areas of interest.
Step 1: Open your image
While this sounds very obvious, you will have found something in your image that you want to highlight.
Select your image of interest in PS. This will open up the image and create it as a layer in the layers palette on the right hand side called ‘Background’
Select your image of interest in PS. This will open up the image and create it as a layer in the layers palette on the right hand side called ‘Background’
Step 2: Rename the 'background' layer
Firstly double click the layer in the layers palette on the right of the screen. This will bring up the ‘New layer’ box where you should type in the name ‘Original’ and then click OK.
Step 3: Selecting your area of interest
Within your image there’s an area of interest that you want to highlight. You are selecting this area in this step so that you can use it as a reference for the size and location of the area of interest within the main image.
Use the marque tool on the left hand side of the menu to select the shape that you want to area outline to be. In this case I have selected a circle. Move your mouse to the area and holding down the left hand mouse key you select the area. You will see a dash line showing the area of selection.
Place your mouse cursor within the selection and right click on the mouse. This brings up the box shown and you want to move your cursor to ‘Layer via copy’ and click on it.
This will create another layer on the right hand side that will contain just that area of selection.
Place your mouse cursor within the selection and right click on the mouse. This brings up the box shown and you want to move your cursor to ‘Layer via copy’ and click on it.
This will create another layer on the right hand side that will contain just that area of selection.
Step 4: Rename the new layer
Here you are going to rename the new layer created above to ‘small detail’ – These named layers are used in order to prevent confusion, When you can easily do the operation, then you won’t need to rename these layers.
The layer is renamed by double clicking on it and renaming it to ‘small detail’ on the new layer box that opens.
The layer is renamed by double clicking on it and renaming it to ‘small detail’ on the new layer box that opens.
Step 5: Duplicate the 'small detail' layer
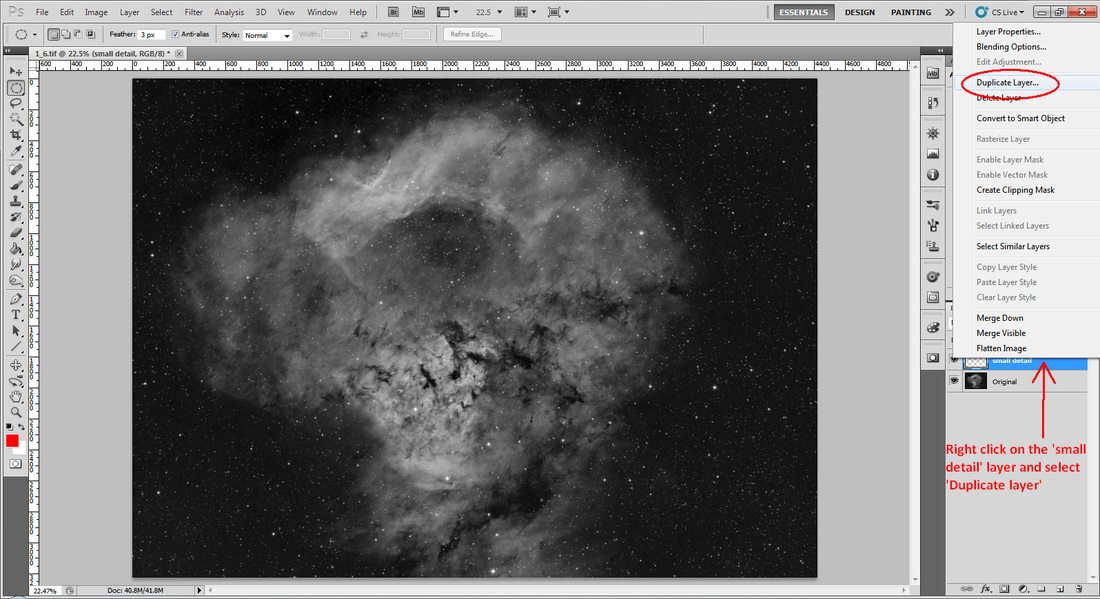
Right click on the ‘small detail’ layer and that brings up a further menu box. At this point select and click on Duplicate layer and the layer box comes up again. Name this new layer as ‘large detail’ and click OK
You will now have three layers in the layers palette as shown below
Step 6: Create group and organise layers
We are now going to create a group containing the ‘original’ and ‘small detail’. This is so that we can alter the size of both of these by the same scale.
Now we need to organise the layers accordingly. The ‘group’ can be dragged and dropped around the layers palette as can the individual layers.
Now we need to organise the layers accordingly. The ‘group’ can be dragged and dropped around the layers palette as can the individual layers.

Your layer palette should be arranged now in the following way.
Step 7: Free transform of 'group 1'
In this step you are effectively shrinking the layers in group 1 so that the ‘large detail’ layer will appear to be larger in size than the original selection.
Highlight the group in the layers palette (by right clicking on it). Then go to Edit > Free transform. Click on Free transform.
You will get a menu across the top where you need to click the following.
Click on the paper clip between the W and H percentage. This will keep the scale the same of both width and height. I put 40% into this and it immediately shrinks the background accordingly
You will get a menu across the top where you need to click the following.
Click on the paper clip between the W and H percentage. This will keep the scale the same of both width and height. I put 40% into this and it immediately shrinks the background accordingly

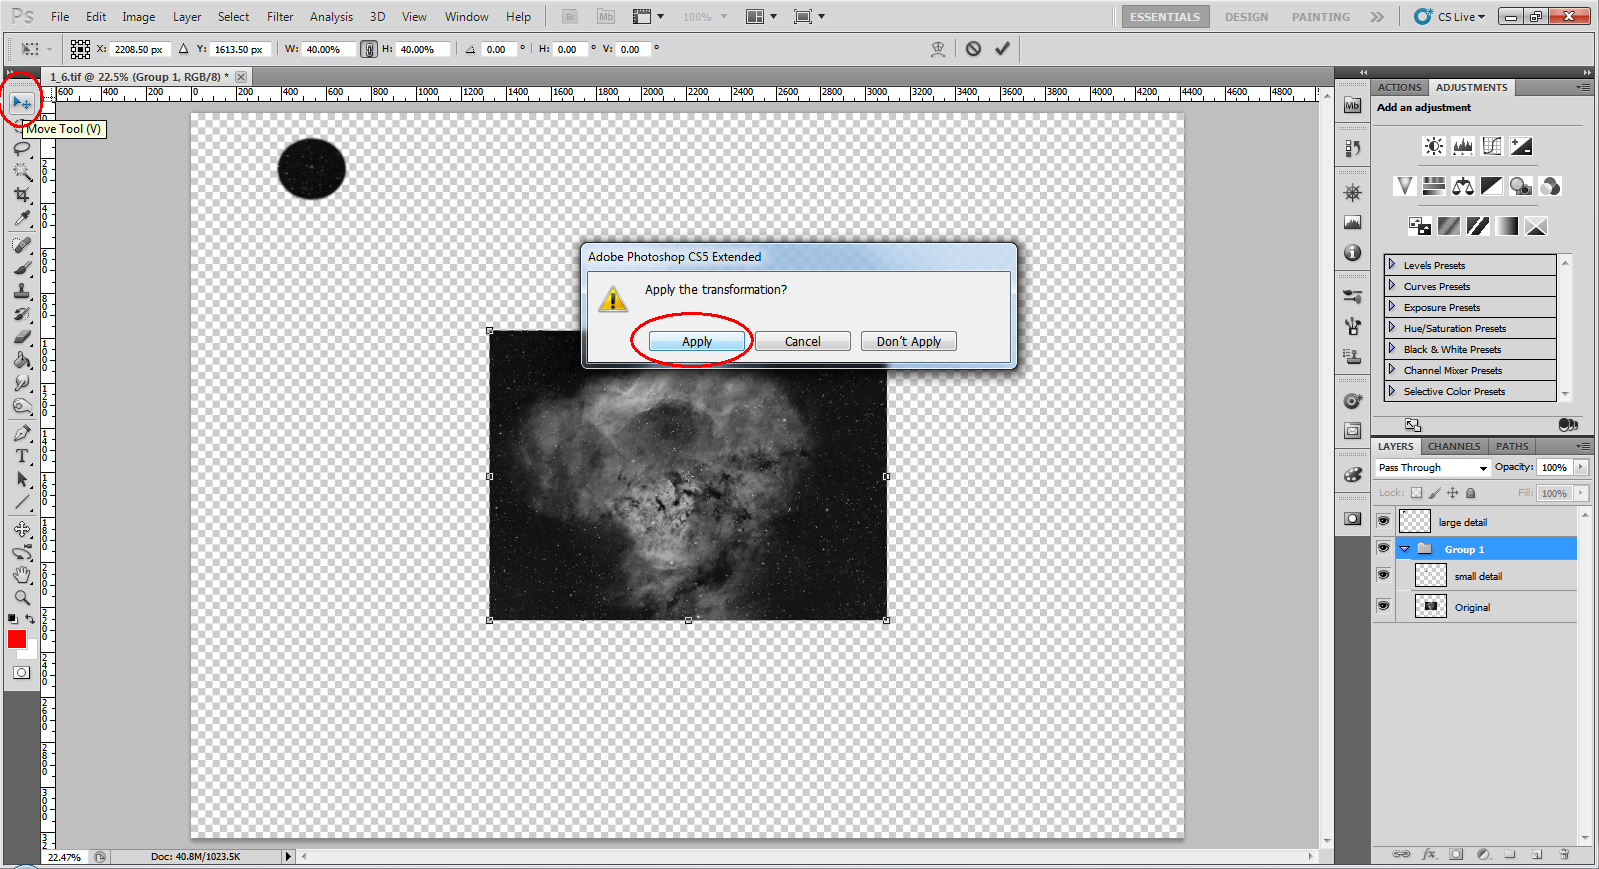
In order for the transformation to be permanent, click on the move tool in the top of the left hand menu and you will be given a box to confirm if you want the transform applied. Confirm that and that transformation is complete.
Step 8: Creating a border around the area of interest
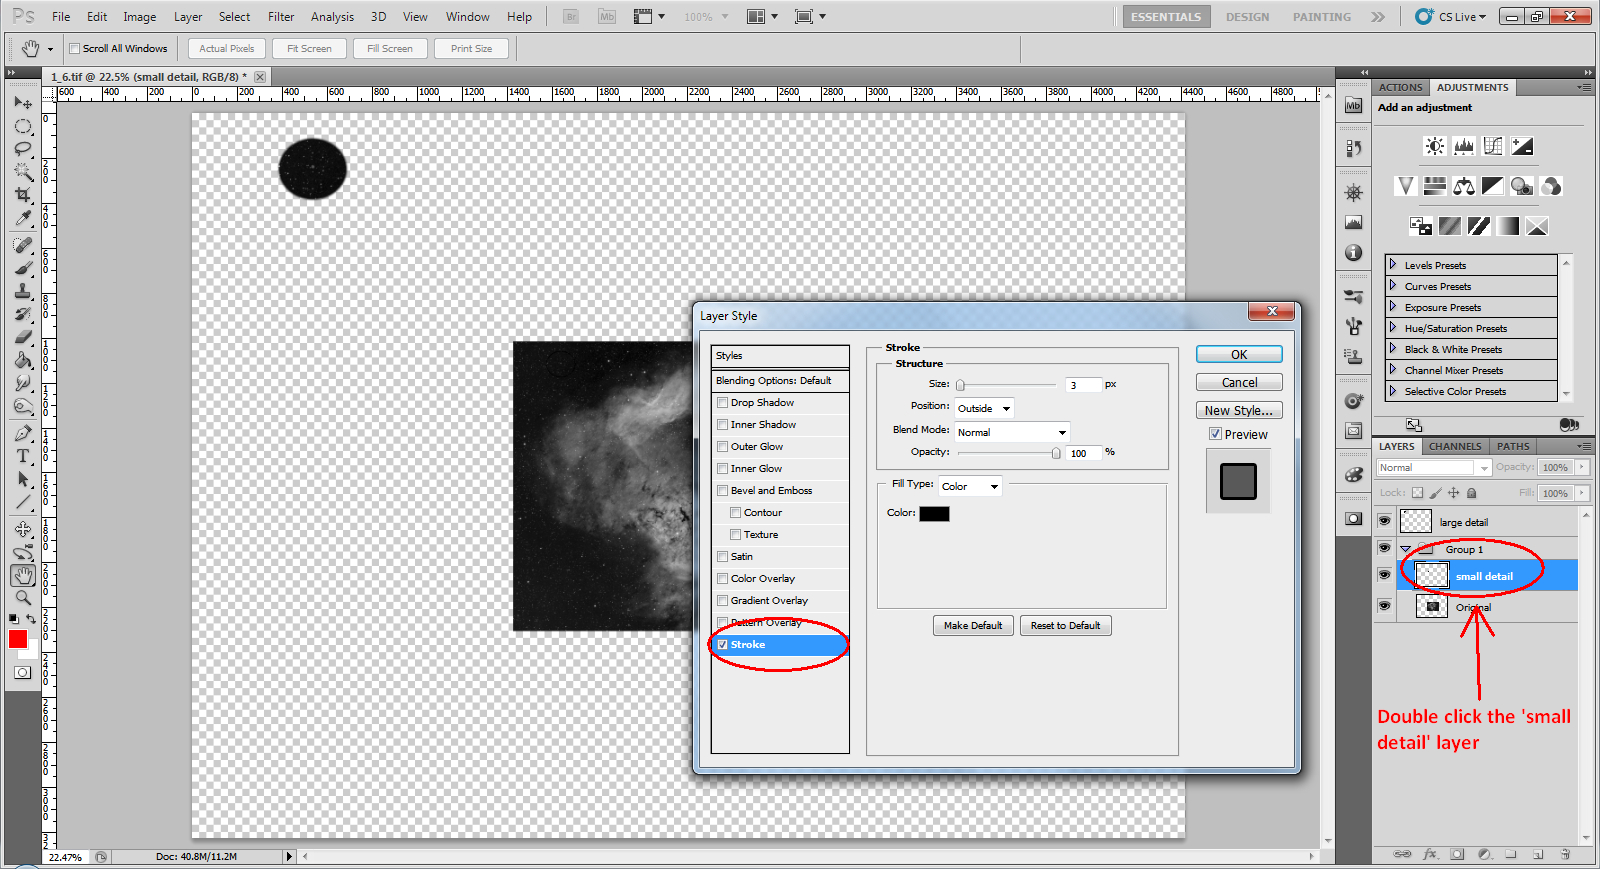
Double click on the ‘small detail’ layer and ensure that it is highlighted in blue. From there the layer style box will be displayed and you want to double click on the stroke at the bottom of the box.
Now select the pixel width of the edge of the selection. Also double click on the colour tab and the select stroke colour window allows you to choose any colour you like for the outline. In this case I have selected red.
Now select the pixel width of the edge of the selection. Also double click on the colour tab and the select stroke colour window allows you to choose any colour you like for the outline. In this case I have selected red.
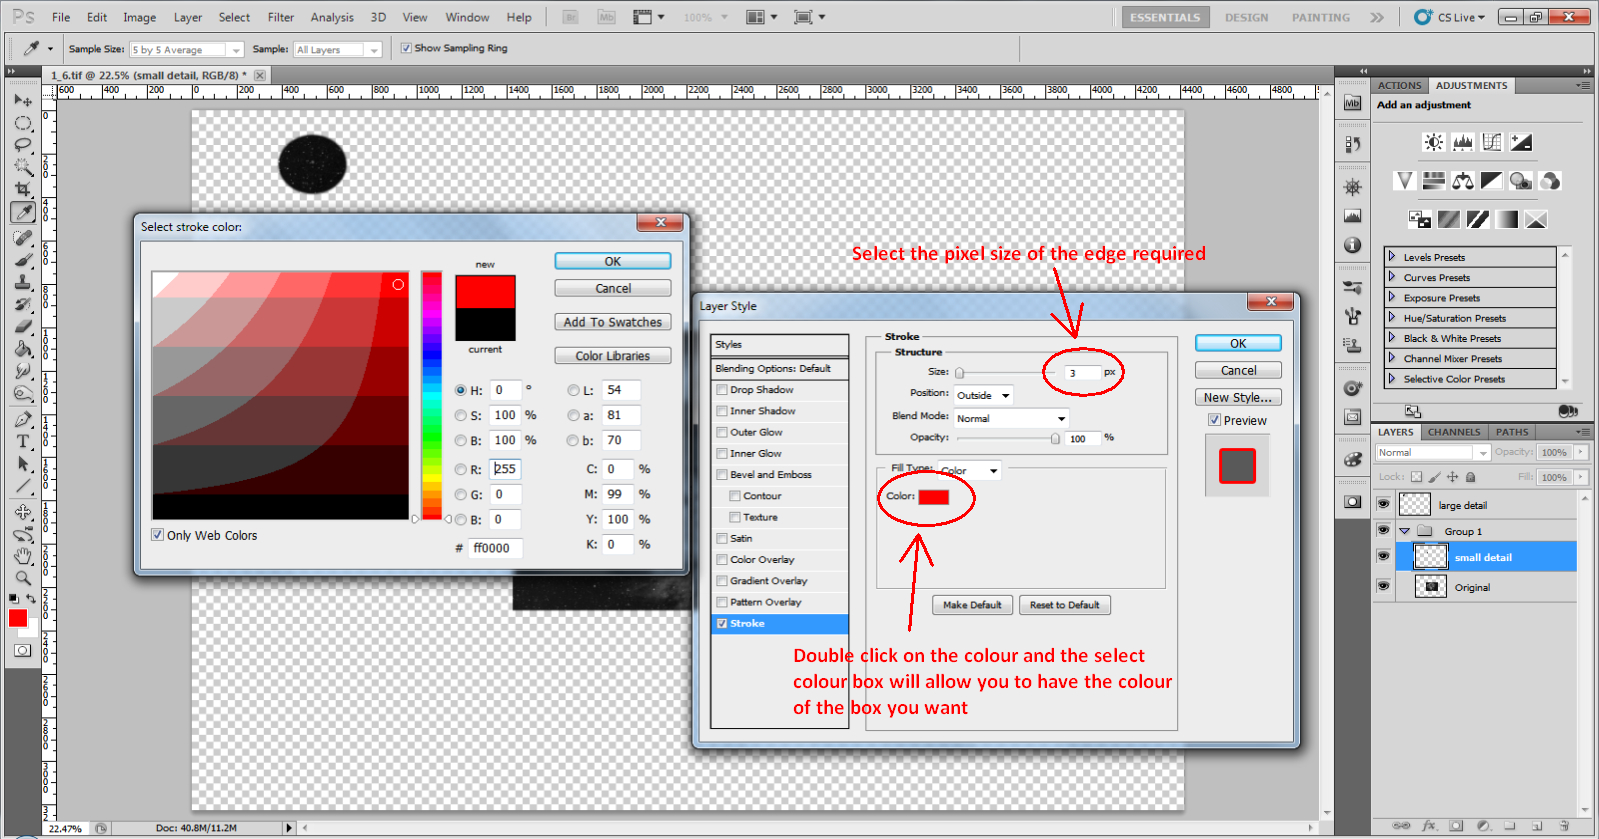
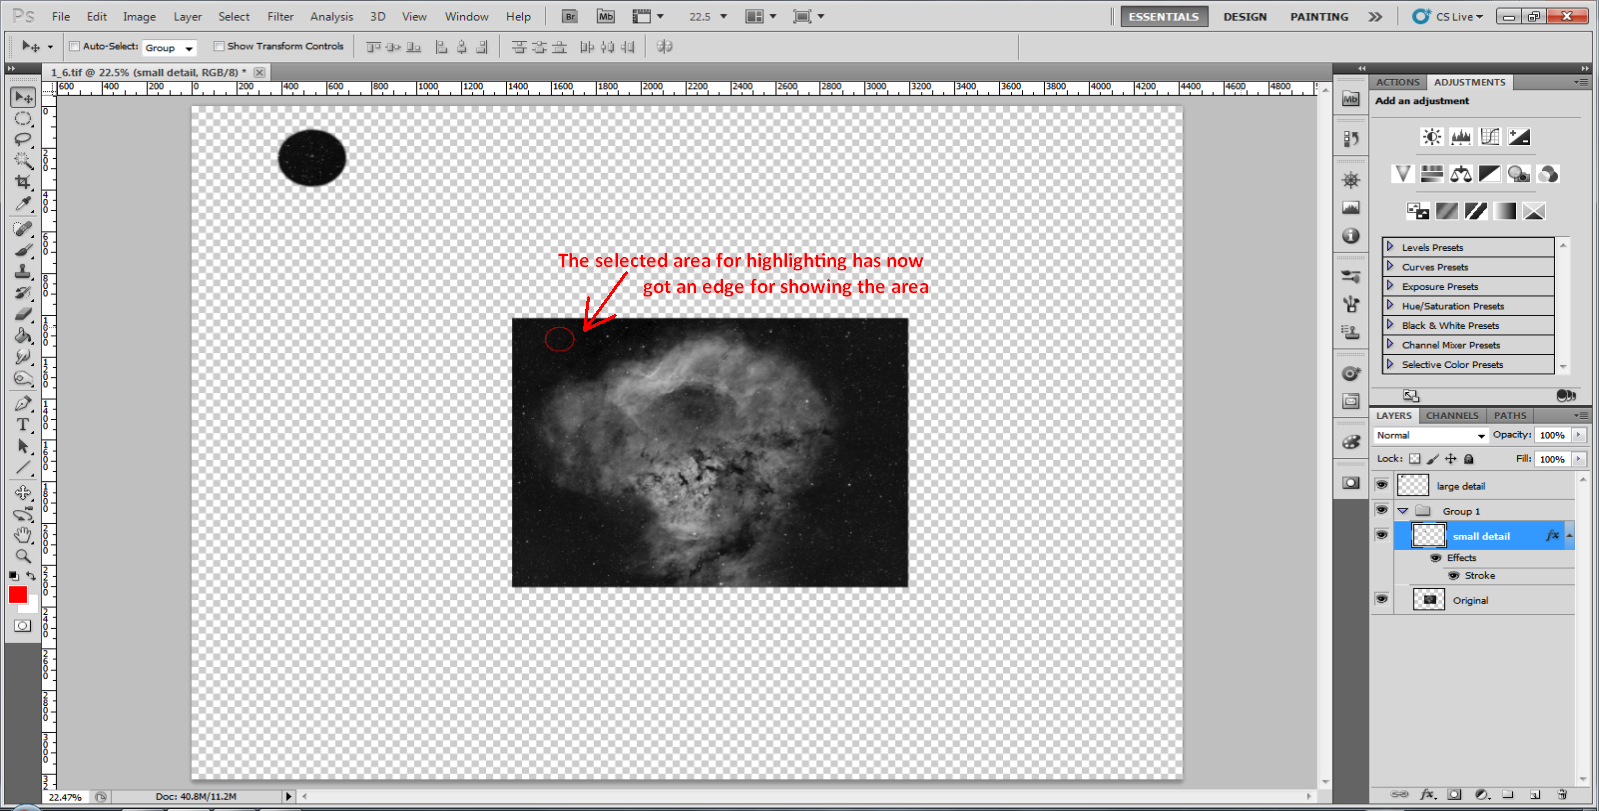
Once these selections have been made, click on OK in both the select stroke colour and layer style window. Now you can see that your selected area of interest has an edge around it.
Step 9: Copying the same edge detail for the 'large detail' layer
Now you want to copy the same edging for the ‘large detail’ layer. Right click on the effects layer in ‘small detail’ and you get a menu box. Click on copy layer style.
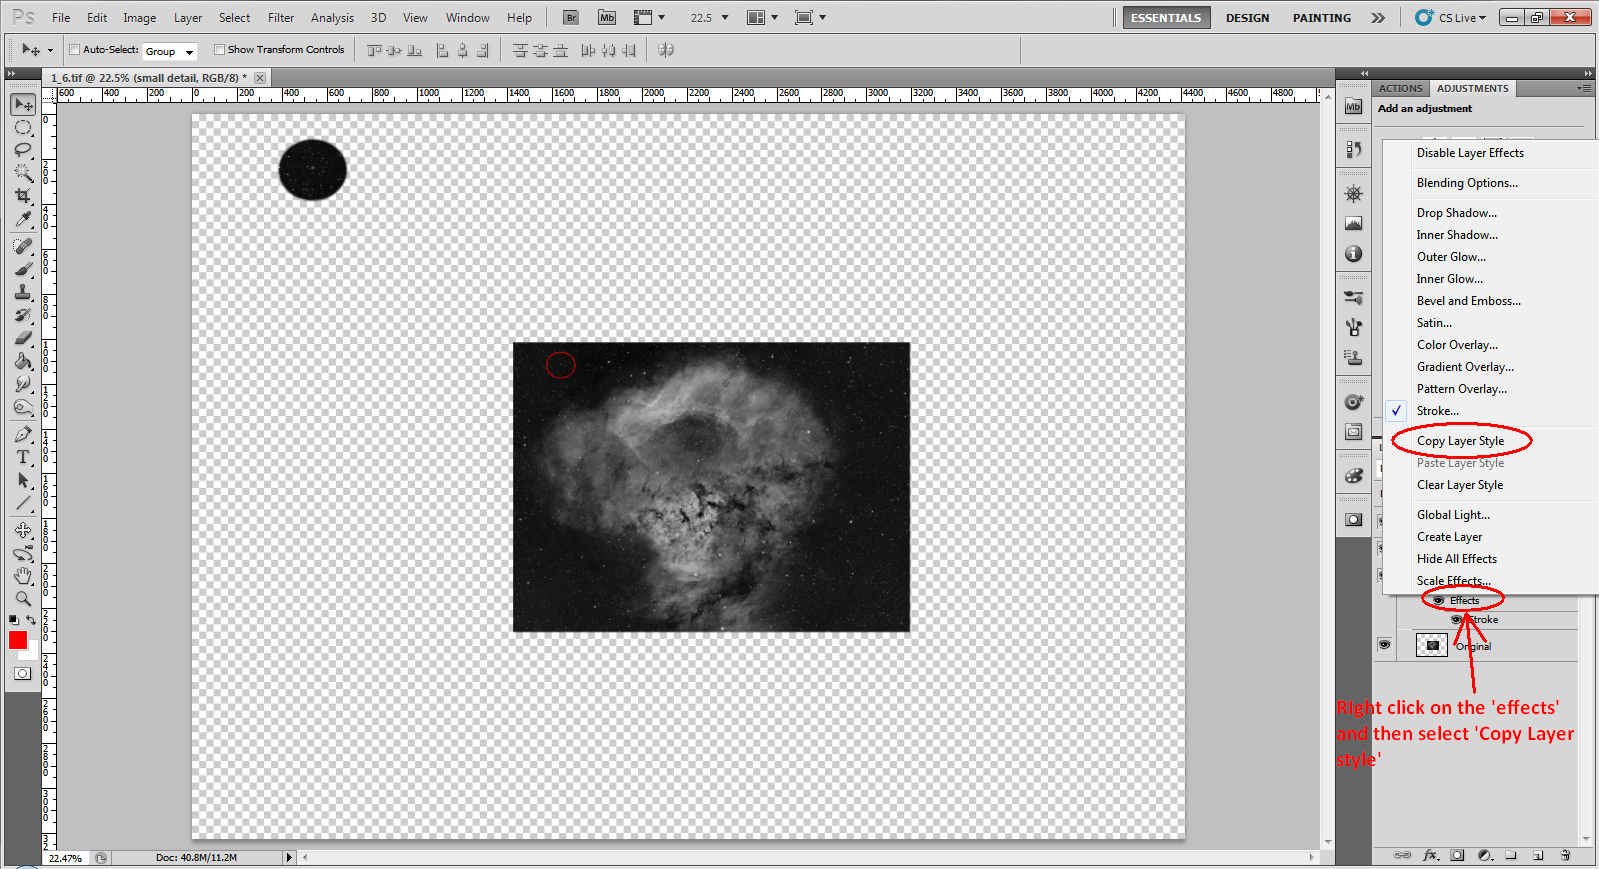
Now right click on the ‘large detail’ layer and that will become blue as well as the menu popping up again. Click this time on paste layer style. This will paste the same layer style into the ‘large detail’ layer and you will see an equal red edge appear on the larger inset selection.
Step 10: Moving the large inset onto the background image
Coming towards the end of this process we are now going to move the larger selection into place on the original image.
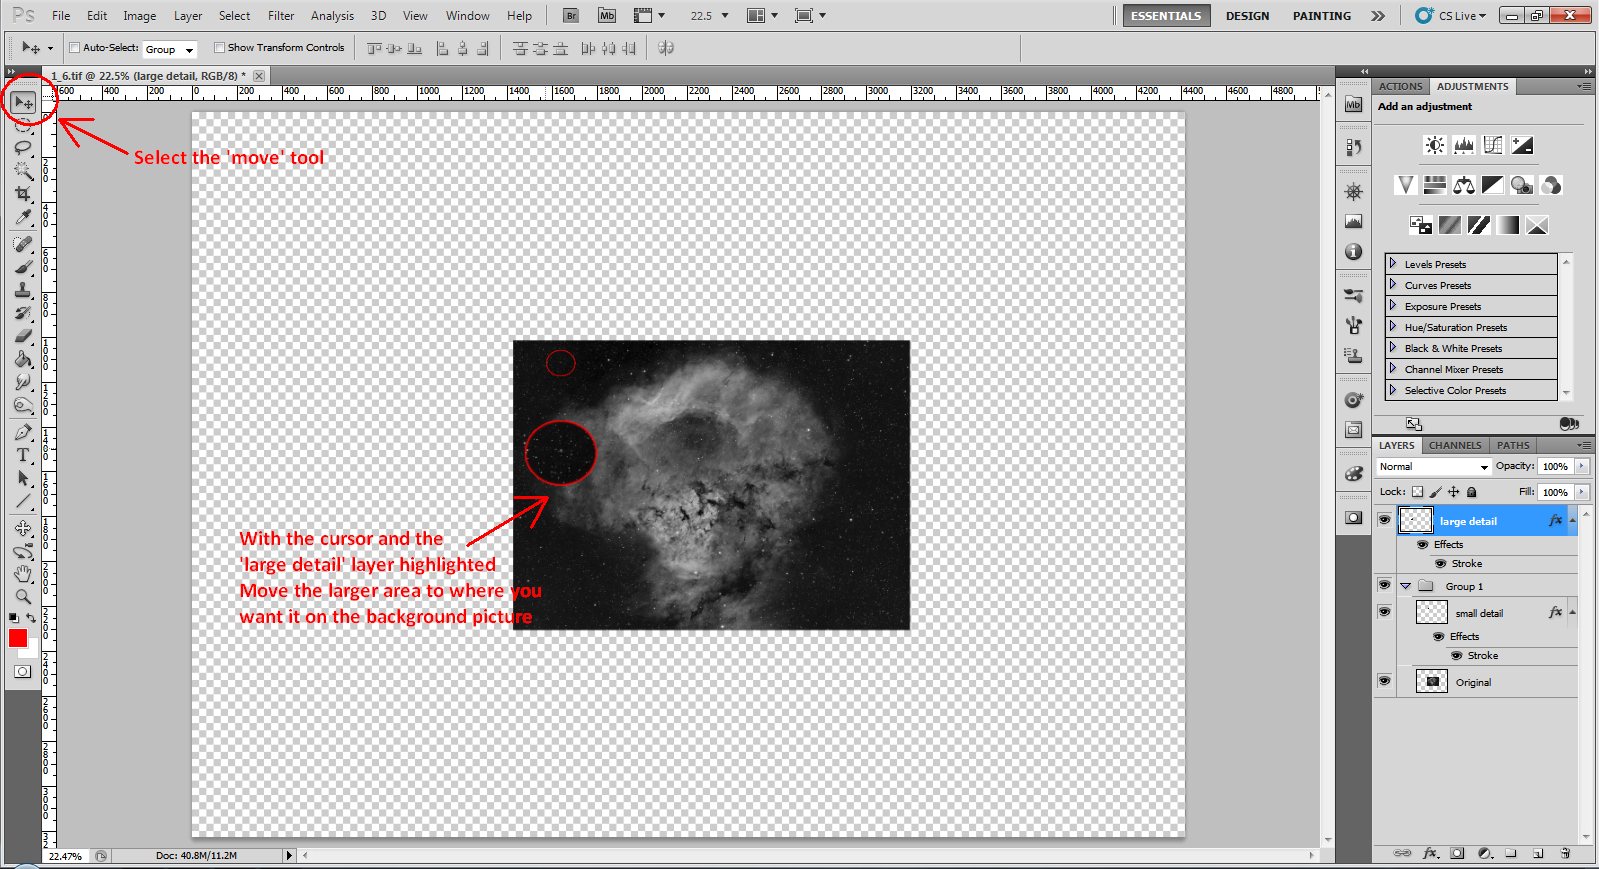
Click on the move cursor on the left hand menu. Now holding down your left mouse key, hover over the large selection and move it to wherever you want to place it on the finished original image.
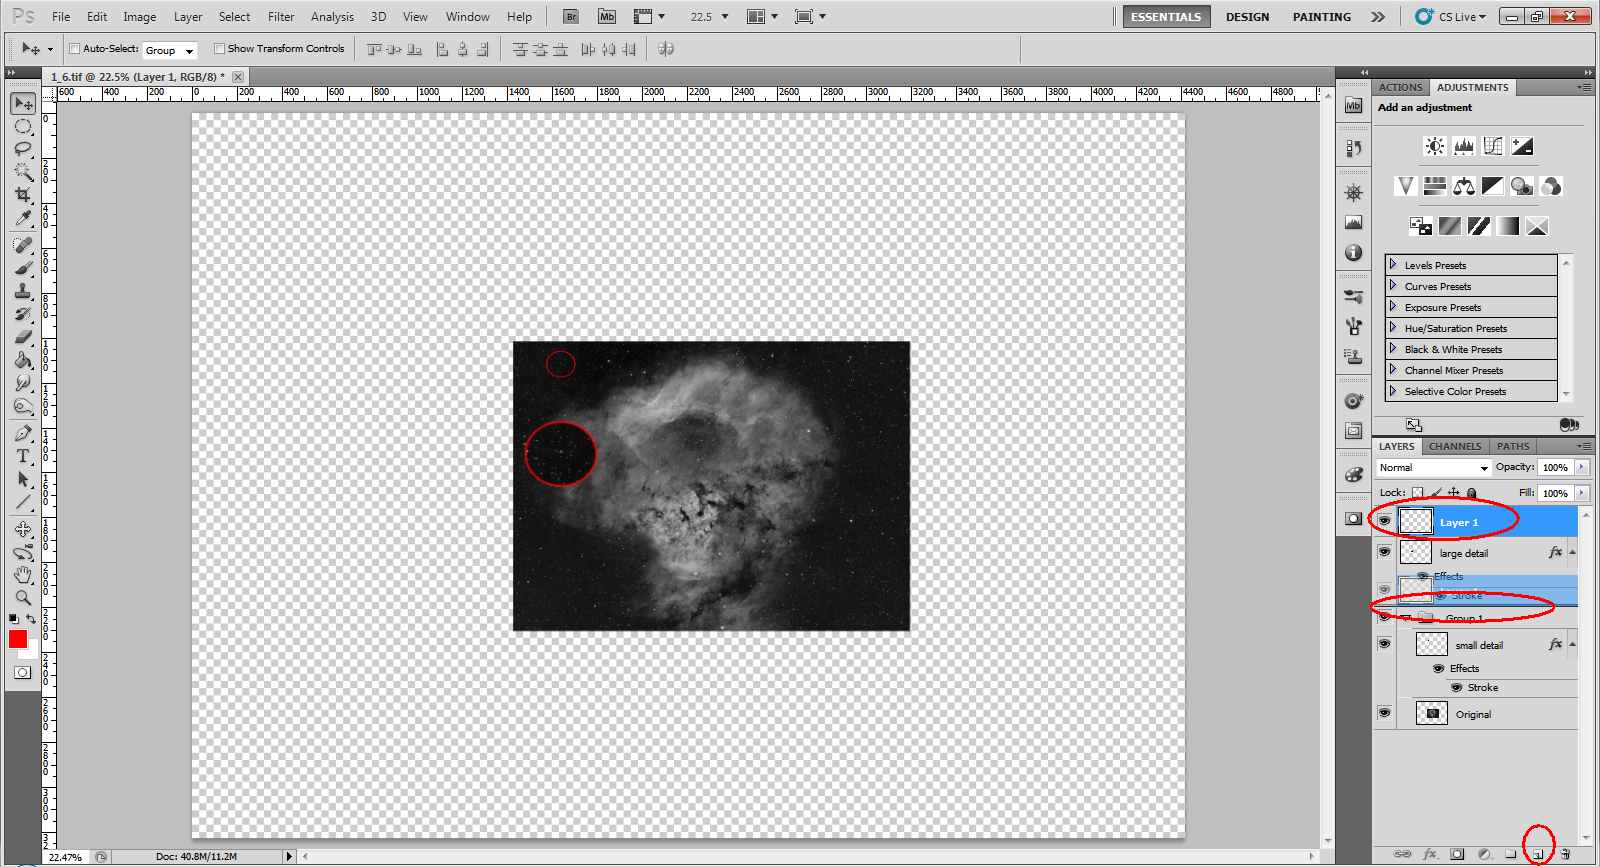
Step 11: Creating the guide lines between the two selections
Now we have 2 outlined selections, the first is the reference point in the main image. The second is an apparent magnified view of the selection that has been placed in a suitable place for comparison. We need to draw lines to visually aid the comparison of the two selections.
To do this create a new layer at the bottom left. This layer will be placed at the top of the layers palette above the other layers. For ease I like to move this in between the ‘large detail’ layer and the group 1. This is done as a simple drag and drop placing it between the two.
To do this create a new layer at the bottom left. This layer will be placed at the top of the layers palette above the other layers. For ease I like to move this in between the ‘large detail’ layer and the group 1. This is done as a simple drag and drop placing it between the two.
Ensure that this new layer is highlighted. Click on the line tool in the left menu. The top menu displayed can be changed in the following way.
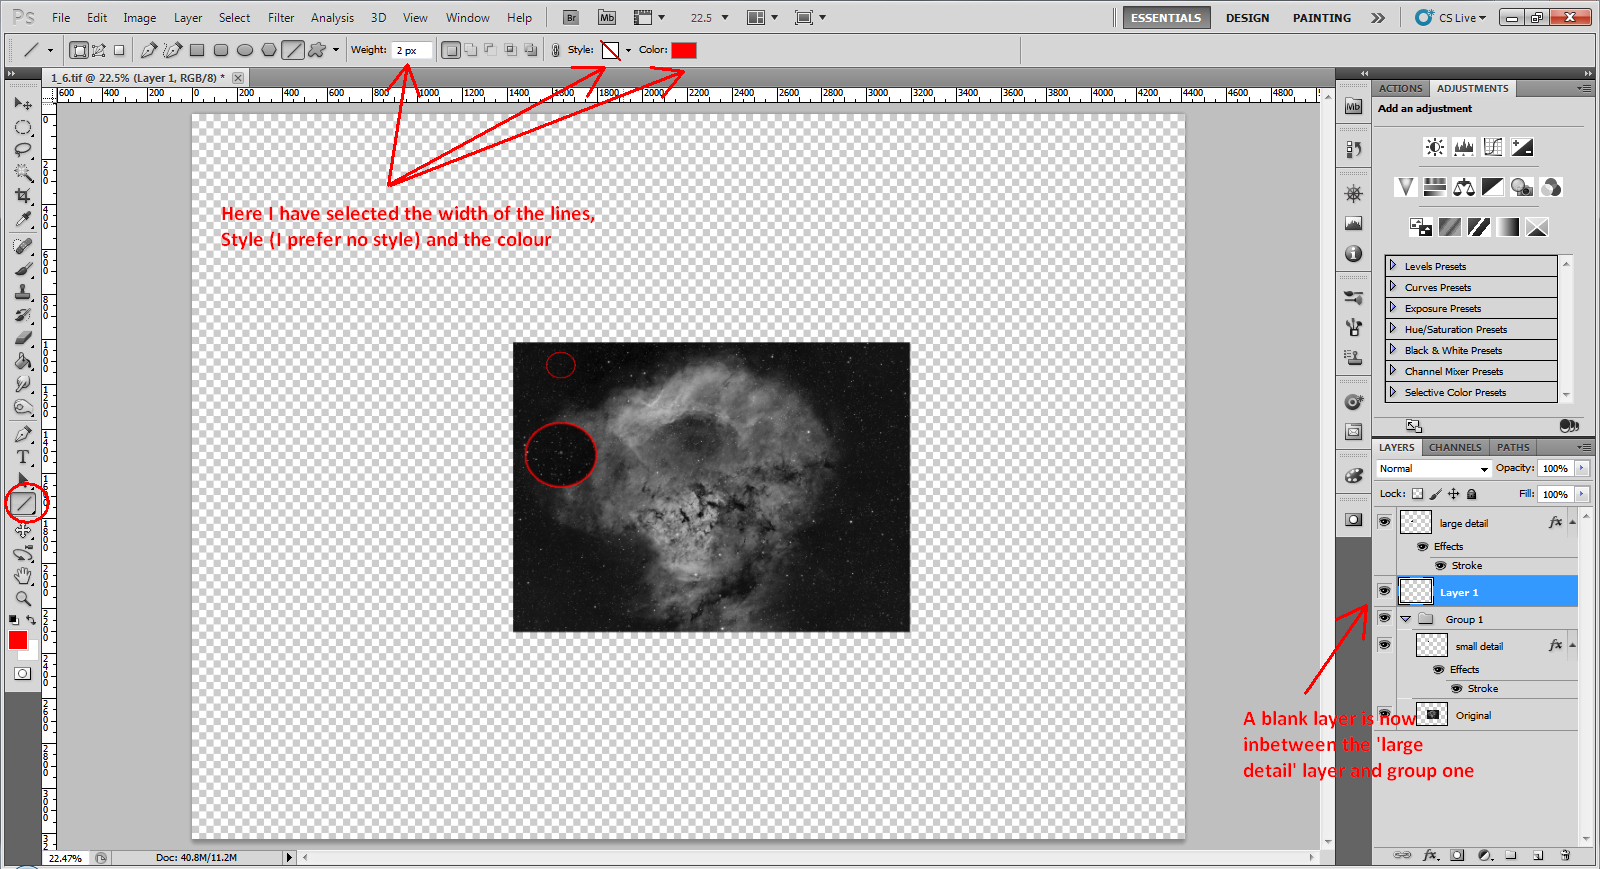
Here you are selecting the following.
- Width of the line in pixels
- Style of the line (I use no style in this case to keep it simple)
- Colour of the lines (I prefer to keep them the same as the selection edges)

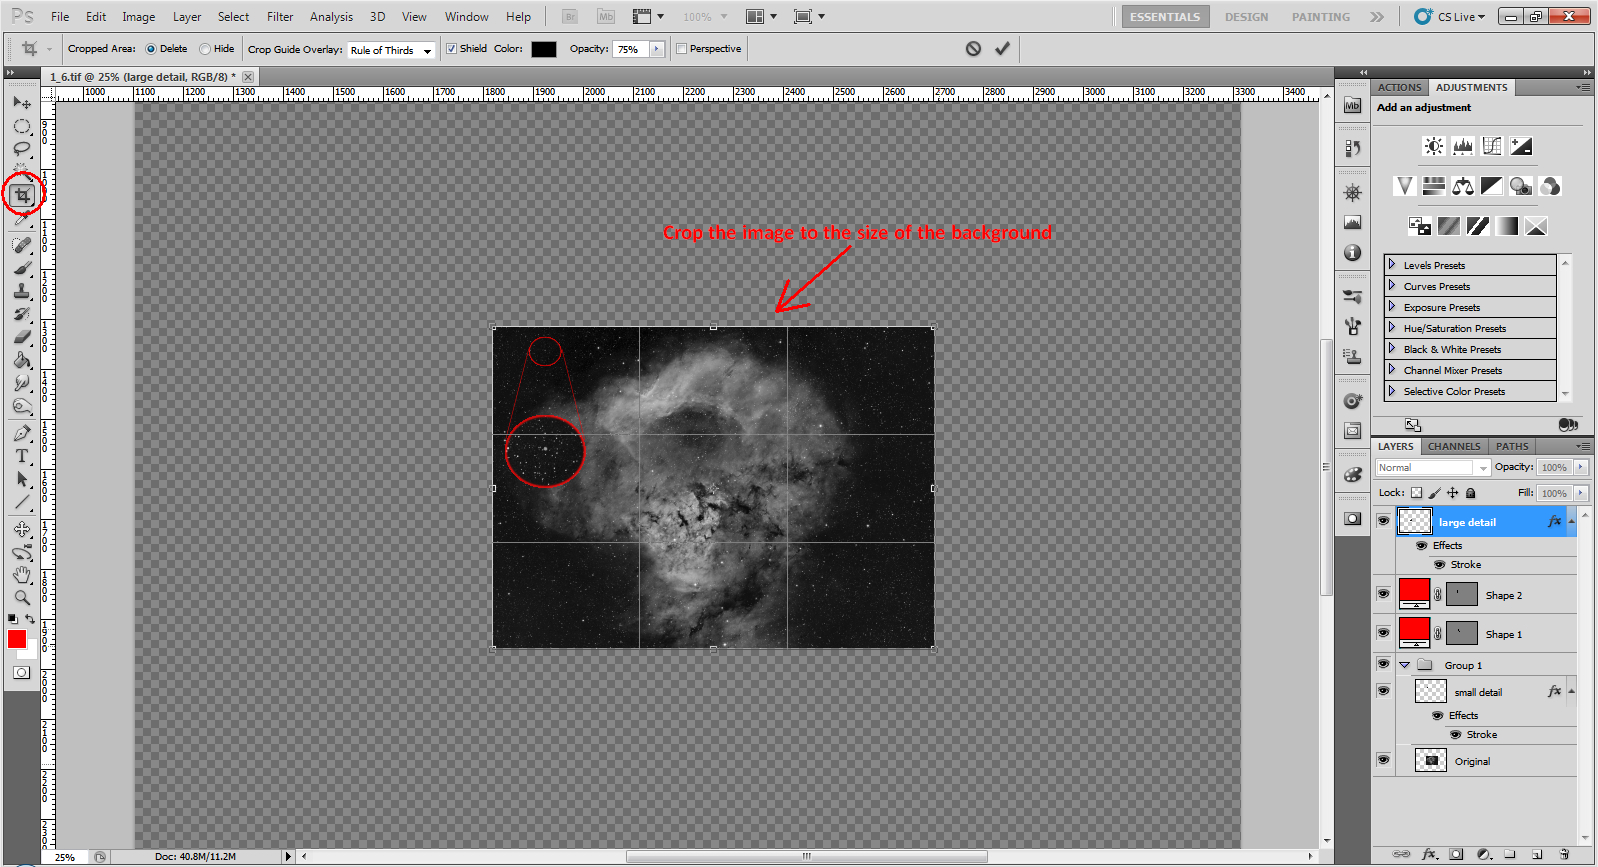
Step 12: Crop and flatten
Just to finish off this image you need to crop and flatten the image. Select the crop tool on the left menu and crop the selection around the original image. Press ‘enter’ on your keyboard and the crop will be done.
All you need to do now is flatten the image so that all of the layers are compressed. Click on layer > Flatten.

Now you have your main image, with an area of interest highlighted within the image as a reference and a larger highlighted selection showing greater detail, that is easily seen and compared to the overall image.
