The Eagle S
You can get information about the Prima Luce Eagle S on the PrimaLuceLab website
What is the Eagle S?
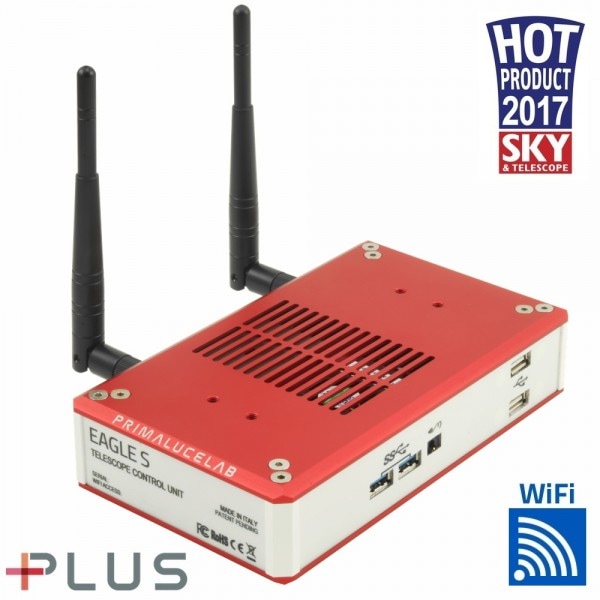
The Eagle S is a small computer that is designed around the requirements that people have for astro photography. It is innovative and practical as it helps to eliminate the numbers of cables that cause so many problems in imaging. It is designed with so many well thought out aspects that it will make life easier in a number of ways.
You can power hardware through it.
It has enough USB's for most peoples needs
It has good Wi Fi coverage - I have found it very stable
It can be controlled by a tablet or smart phone
It has a low power consumption useful for mobile set ups
Specifications:
You can power hardware through it.
It has enough USB's for most peoples needs
It has good Wi Fi coverage - I have found it very stable
It can be controlled by a tablet or smart phone
It has a low power consumption useful for mobile set ups
Specifications:
- Processor: Intel (R) Core (TM) 13-5010U CPU @2.10GHz Running W10
- Memory: 8GB RAM
- System type: 64-bit opertaing system, x64 based processor
- Drive: 128GB SSD
- USB: 6xUSB ports (4xUSB 3.0 and 2xUSB 2.o)
- Power outputs: 4 outputs of 12v (2x3A and 2x8A)
- Power consumption: Max 1.2A / hour @12v
- Remote control through ethernet: yes
- SO: Windows 10 Enterprise
How does it all fit together?
In an attempt to address the issues that astro photographers have with so many cables, the Eagle S aims to recify this to a considerable degree. In fact this is probably it's biggest advantage over any everyday PC.
The first great feature is that it slots into the PLUS mounting system from PrimaLuceLab. The complete mounting system all fits together with the correct mounting holes so that you are no longer trying to mix and match different imperial holes with metric holes........ I have reviewed the PLUS mounting system as I found it very easy to use.
The first great feature is that it slots into the PLUS mounting system from PrimaLuceLab. The complete mounting system all fits together with the correct mounting holes so that you are no longer trying to mix and match different imperial holes with metric holes........ I have reviewed the PLUS mounting system as I found it very easy to use.
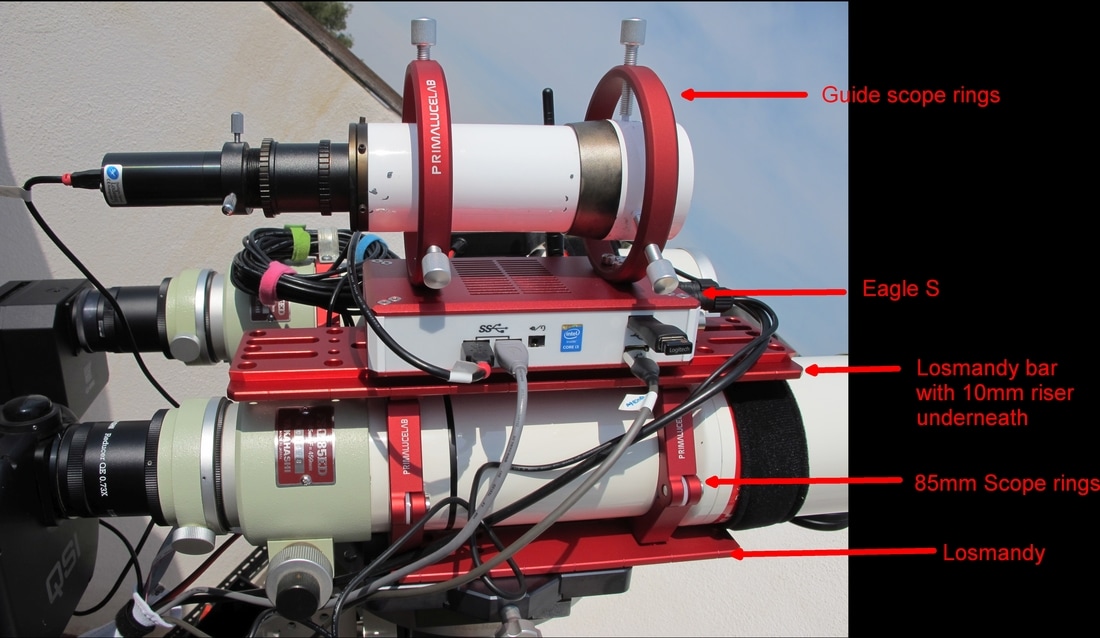
Here you can see the various components that are needed to put the system together.
- Lower Losmandy to attach to the saddle
- 85mm Scope rings
- 10mm riser (not showing in picture)
- Losmandy on top of scope rings
- Eagle S
- Guide scope rings
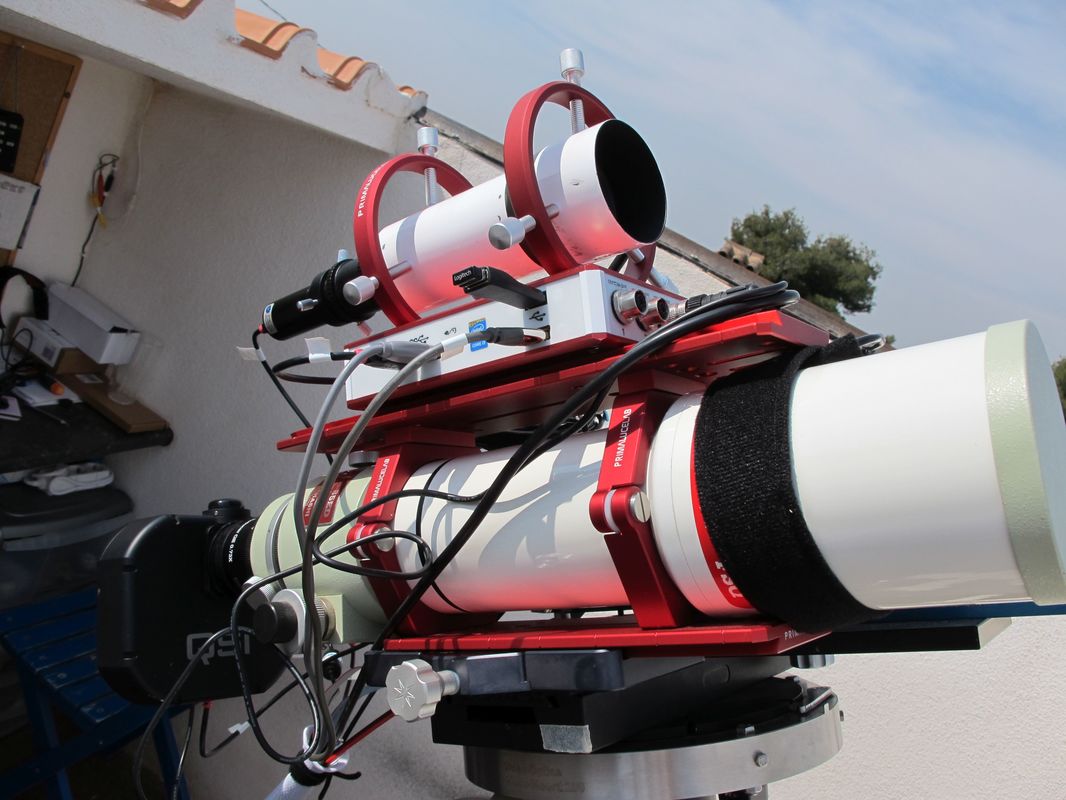
I needed a Losmandy on top of the rings as my scope rings were further apart than the size of the Eagle. If your scope is smaller then there's every chance that you will be able to locate the Eagle directly on top of the rings. You can see below that the Eagle is not as long as the scope rings are apart.
I also needed a 10mm riser between the scope rings and the Losmandy bar to allow for the focus tension and the dew shield.
The Eagle S screws directly onto the Losmandy and on the top side of the Eagle are mounting holes for the guide rings.
If you are using a Losmandy in between the rings and the Eagle, then the Losmandy needs to be inverted so that the heads of the fixing bolts are recessed. If this is not done then the Eagle can not screw directly onto the Losmandy.
All the mounting system comes with M6 screws.
Connections to hardware
PrimaLuceLab will supply a number of power cables so that you can connect hardware directly into the power outputs of the Eagle. I have a QSI power supply, so that connects directly from the QSI to the Eagle. Other power cables are available or if you speak with PrimaLuceLab then I am sure that they can make up the necessary power cables.
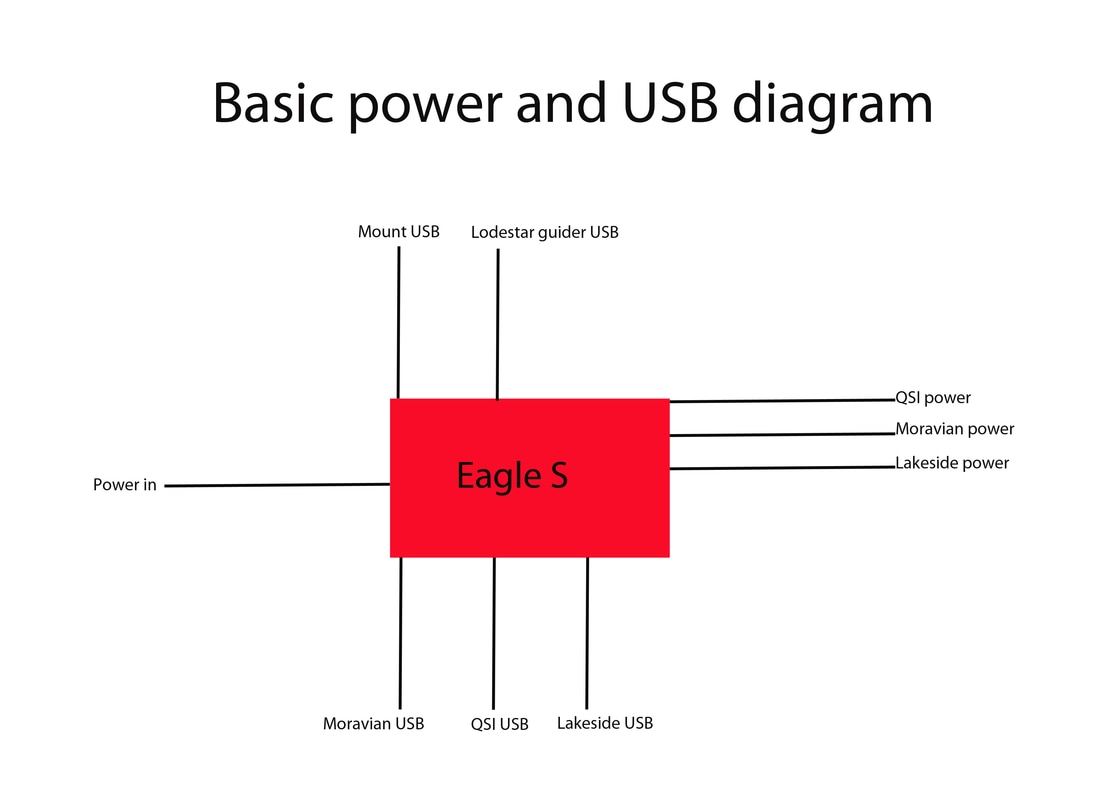
There are a few peripheral USB connectors that I have that are not listed below as they are not essential. Below is only showing the most basic of USB and power setups.
Extra USB connections I have........
Bue Astro Stick Station
Keyboard (when needed for setup and working with the monitor)
I have the following on a dual rig.......
Using this configuration there are only two cables coming up to the Eagle 1) The Power cable and 2) the Mount.
It makes sense to have short USB cables - I am using 3m ones from the dual setup with a normal computer, but nice short cables would make it even tidier.
It is worth pointing out here that the Eagle S has a mini display Port for monitor connection. You will need to use this to get the PC set up for the first time at least. I used the Amazon basic adapter so that I could use my monitors HDMI cable.
The computer itself
The computer comes pre-loaded with the following software:
There is no uneccesary bloatware on the system.
The supplied manual takes you through the whole setup process of the Eagle, including passwords, wifi key and language selection of Windows as it starts up. I found this to be a simple process when following the supplied manual.
I have now loaded on the following software:
I have been using this with my dual setup and it has been running perfectly - There's no memory issues for me and there have been no shut downs. I have it set up remotely so that I can control everything from the sofa. At the end of each run (the following morning) I check and remove the images taken the night before and put them on my main processing PC. To this end I never have much data on the Eagle.
I can imagine that if you are using a new CMOS camera with large files and you are taking many of them in one night you could struggle with space... this would need to be investigated for your own personal requirements.
The Eagle is fast and I have used it exclusively with Wi Fi and not Ethernet as I usually do. This has been very reliable and I've had no drop outs.
I have found that there are sufficient USB connections and the 4 power cables are great to keep as much of the wiring as possible from having to travel down the mount.
This can be used with an independent monitor, but also you can control the computer with a smart phone or a tablet. This makes it a very versatile proposition for people who transport their setup's to remote areas as there will be no need to dis-assemble any of the mounting system and the Eagle will just need to have it's cables connected and off you go!
- PHD
- ASCOM
- Cartes Du Ciel
There is no uneccesary bloatware on the system.
The supplied manual takes you through the whole setup process of the Eagle, including passwords, wifi key and language selection of Windows as it starts up. I found this to be a simple process when following the supplied manual.
I have now loaded on the following software:
- SGP
- Sitech
- Relevant camera drivers
- Lakeside utilities and drivers
- Blue Astro stick station
- Sharpcap (For mallincam all sky)
- Bahtinov Grabber
I have been using this with my dual setup and it has been running perfectly - There's no memory issues for me and there have been no shut downs. I have it set up remotely so that I can control everything from the sofa. At the end of each run (the following morning) I check and remove the images taken the night before and put them on my main processing PC. To this end I never have much data on the Eagle.
I can imagine that if you are using a new CMOS camera with large files and you are taking many of them in one night you could struggle with space... this would need to be investigated for your own personal requirements.
The Eagle is fast and I have used it exclusively with Wi Fi and not Ethernet as I usually do. This has been very reliable and I've had no drop outs.
I have found that there are sufficient USB connections and the 4 power cables are great to keep as much of the wiring as possible from having to travel down the mount.
This can be used with an independent monitor, but also you can control the computer with a smart phone or a tablet. This makes it a very versatile proposition for people who transport their setup's to remote areas as there will be no need to dis-assemble any of the mounting system and the Eagle will just need to have it's cables connected and off you go!
The guiding hardware
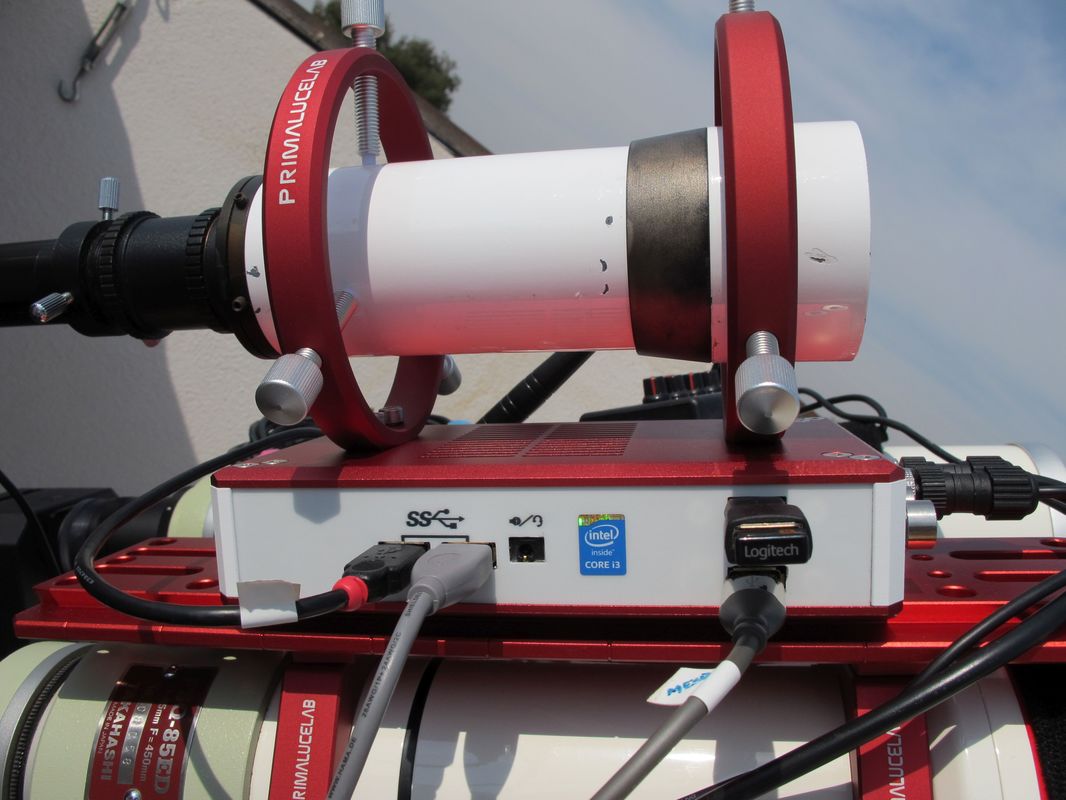
The guide rings are solid in their construction. There is one specific limitation that you can see in the image below..... The pre drilled and tapped holes for the guide rings on top of the Eagle are a set distance apart. This has meant that my 10x60 guide scope has to be fixed on the dew shield as the little scope itself isn't long enough.
I think I'd like to see a selection of drilled holes so that the distance between the guider rings can have some adjustment.
I think I'd like to see a selection of drilled holes so that the distance between the guider rings can have some adjustment.
There is no flexure in this setup and everything is rock solid. It is helped by not having to try to mix and match different mounting systems - Everything from the PrimaLuce range fits together with ease and rigidity.
Stars have been perfectly round and small with the two scope setup and routinely taking 30 minute exposures. Further evidence of the lack of flexure and rigidity of the mounting.
As an aside, you can see in this photo the 10mm risers that are located between the scope rings and the top Losmandy plate.
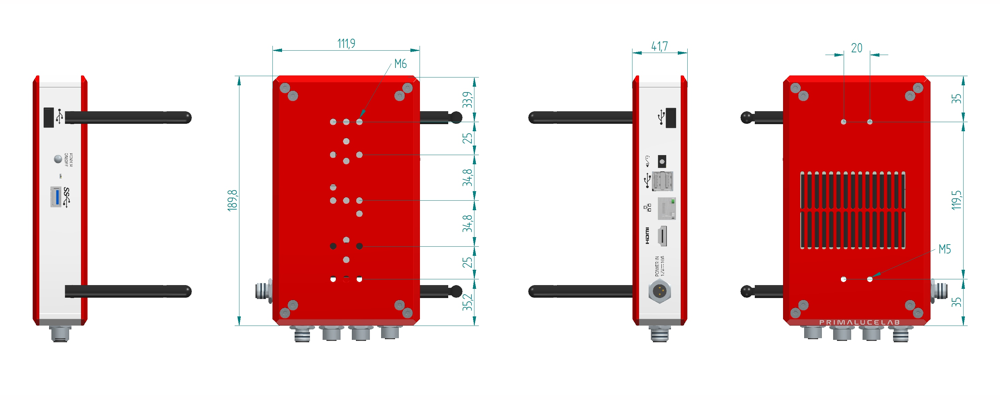
Dimensions of the Eagle S
Additional thoughts
With the dual setup that I am using the Eagle with, this setup actually helps me with balance. In order to get the second scope perfectly aligned to the first I have a heavy adjustment saddle on the second scope. The computer on the other scope actually helps distribute the weight better and makes it easier to balance.
If you are using a singe scope, then weight on the top of the single scope will not be an issue for balance.
I have found the Eagle to be a compact and innovative way of working. Someone has asked me what is the advantage over the small PC that he has attached to his OTA. I would say that the biggest advantage is the ability to keep everything tidy and quick to set up. The Eagle, with it's 6 USB ports is certainly geared more towards use in imaging...... I doubt that there are many mini PC's out there with 6 USB ports (My NUC has 4). Also the ability to be able to power 4 imaging essentials makes a lot of sense and certainly is not something that you would find on a 'normal' PC. The 4 power cables could be used to power the following on a single scope setup.
- Imaging camera
- Focuser
- Dew controller
- Mount
In a mobile setup this makes a lot of sense. It also negates the need for laptops in the field.
