How to create a mosaic in Sequence Generator Pro
In this tutorial you will learn how to use the Frame and Mosaic Wizard in conjunction with Sequence Generator Pro to create seamless mosaics. The software will help you select the panes and the framing and will then automatically put it into a sequence. From there you can run the sequence so that you can capture pane after pane using plate solving and without any more difficulties in lining the panes up correctly.
SGPro links
- Sequence Generator Pro (SGPro)
- The additional Framing and Mosaic add on
You will also need to have decided on your target, I’ve used NGC 7000 for this example, and be armed with image scale information about your setup and pixel sizes of your images. You will need to be pretty conversant in SGPro with regards to setting an equipment profile as this will be used to set parameters within the add on.
Things that will help you before you start
Before you click on the F&M wizard, it is of great benefit to have decided what camera and scope combination you are going to use and have that sequence already opened. You can do all of this through the Equipment Profile Manager in the Tools menu. This way, the image scale and image pixel size is already known and this information will be automatically populated into the F&M wizard box.
Step 1: The Framing and Mosaic wizard
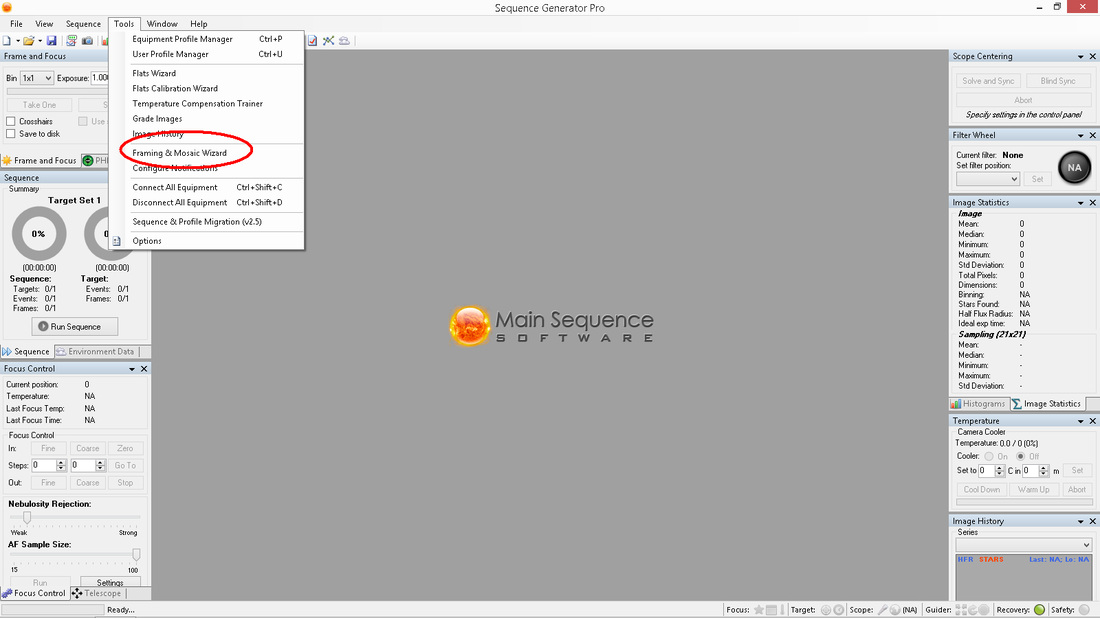
The F&M wizard can be accessed via the Tools menu as shown in the image below.
Step 2: The F&M wizard box
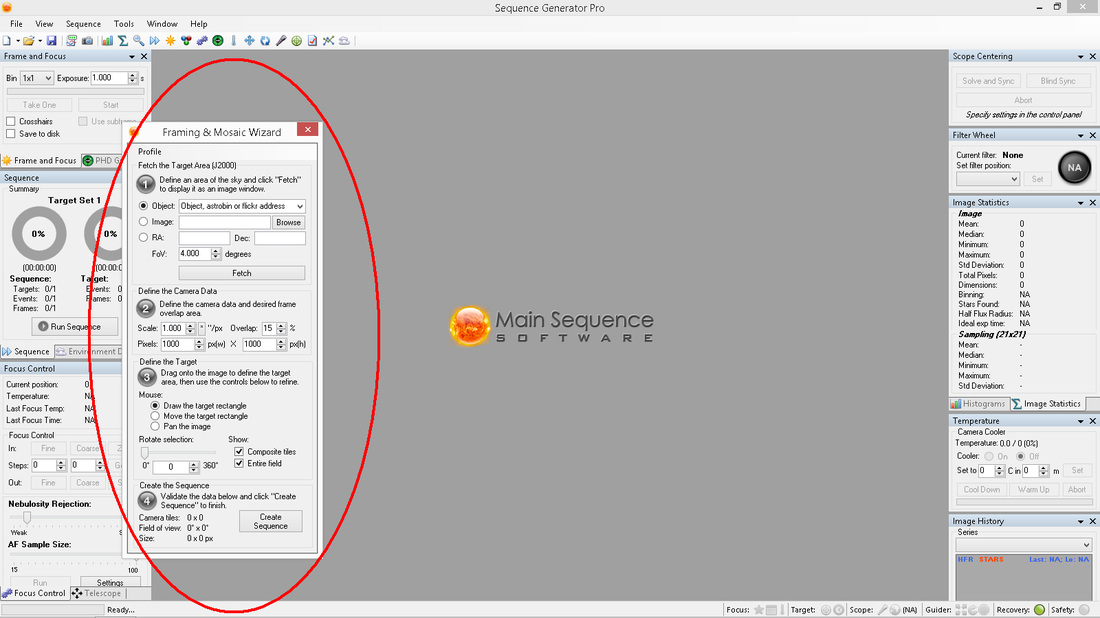
Let’s explain these sections one by one and what is needed.
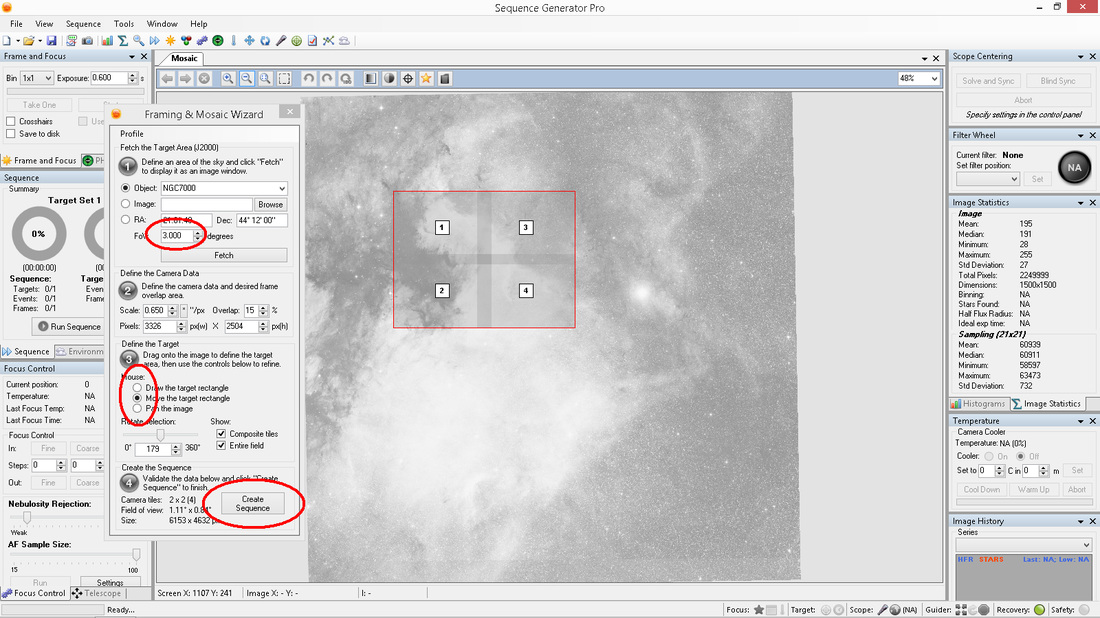
Fetch the Target area
Fetch the Target area
- Object: Here you can manually type in a target (I will later type in NGC 7000). Or you can use an Astrobin or Flickr image that you like (copy and paste the link) as long as it has been plate solved already.
- Image: This can be an image that you already have on your PC – perhaps a previous image that you had taken. In this instance just hit browse and navigate to the image you want to use.
- RA and DEC: You can put in the relevant coordinates for the target.
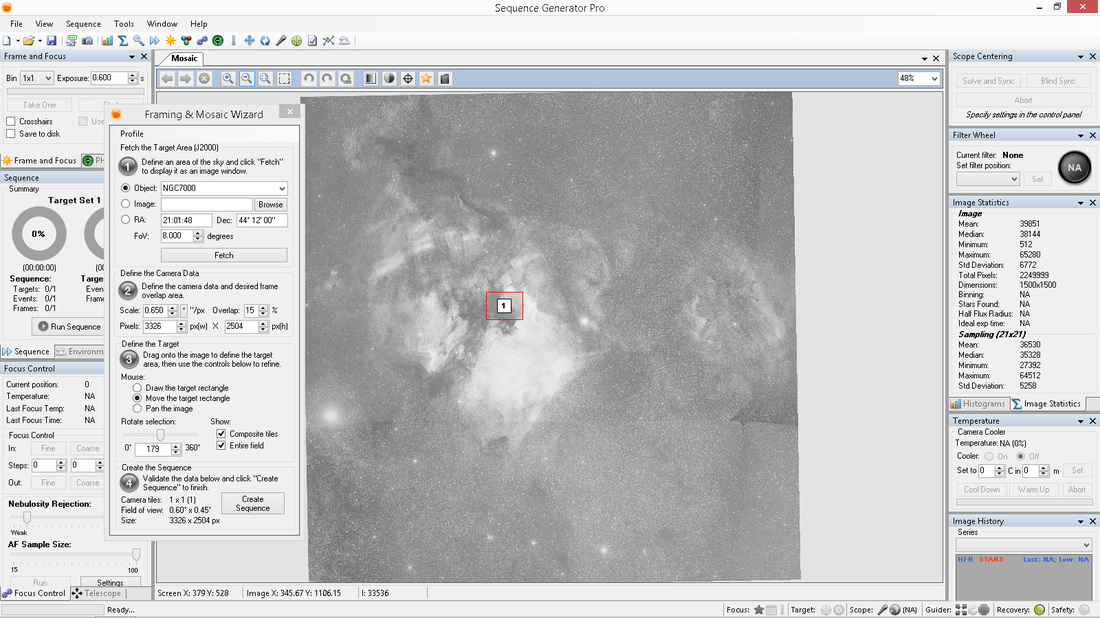
- FoV (degrees): This will determine how much of the target you will see in order to do your framing. I find that for a larger image scale I may have this as large as 8 and for a smaller image scale as small as 2. This really depends on personal preference, how big a mosaic you are planning, etc.
This shows the FoV set at 8 degrees for my longer focal length combination. As you can see NGC 7000 features the complete area and the actual size of the frame I will get with my camera and scope is tiny!
Define the camera dataThis will be automatically populated from your equipment profile used in the sequence. In this example I didn’t use an existing profile, but you will see the difference in a minute.
Important here is the overlap – I have it set at 15% as it ensures a good enough overlap between panes to ensure that the mosaic can be stitched together successfully later on in processing.
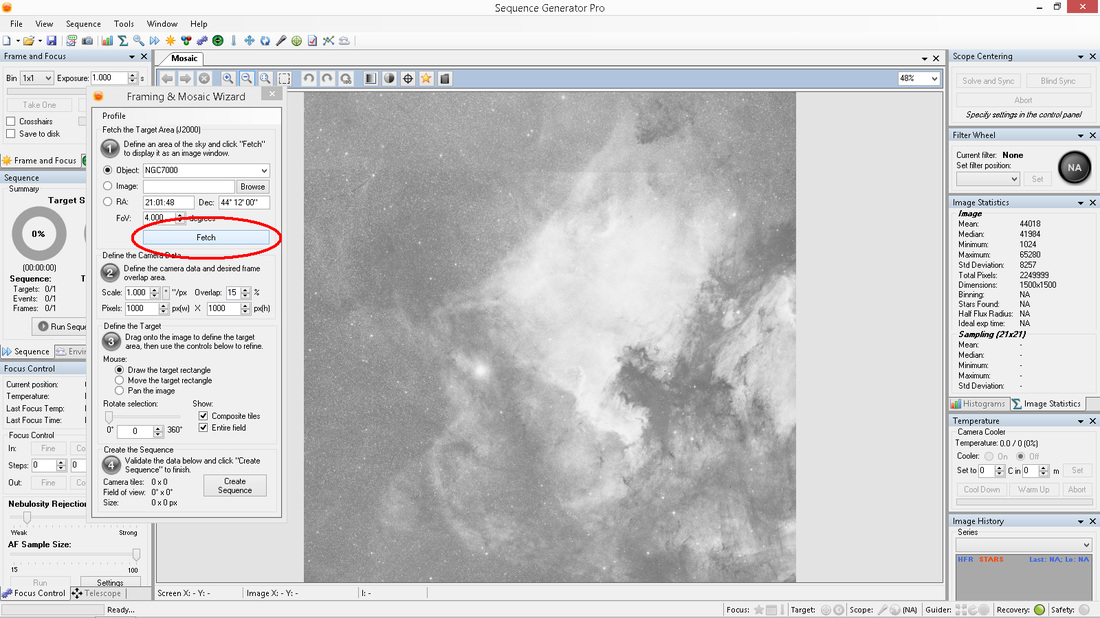
At this stage click Fetch and you will see the target you are going to use populate the middle of the screen.
Define the target
Using the mouse pointer:
Here you are given three options and I only ever use the first two. These are used to represent an accurate image scale of your particular equipment. You hold down the left hand mouse key and draw on the target the area that you wish to image. Each rectangle represents one frame size. You can then move this around using the mouse to any particular areas of interest that you may have in mind to mosaic.
The rest of that section I leave well alone. I don’t use a rotator and I like to keep the camera and scope at the same orientation year after year so that I can go back and add data again and again. You can however rotate the whole target for better framing if you wish. I would say on a personal level, beware of getting too complicated in this area.
Step 3: Putting it all together and setting your mosaic
Here you can see the main areas circled that have been used to create this mosaic. The FoV has been set to 3 degrees as I want to focus on some specific area within NGC 7000. If it was too large a FoV here I would find it more difficult to control and also see what I wanted.
I have used the move tool to outline an area of interest (Cygnus wall in this event) and the F&M wizard has said that this will take 4 panes. You can see them shown and the overlap between the panes as well.
Now press Create Sequence.
Step 4: The Mosaic Sequence
From this screen there are a couple of things you can do.
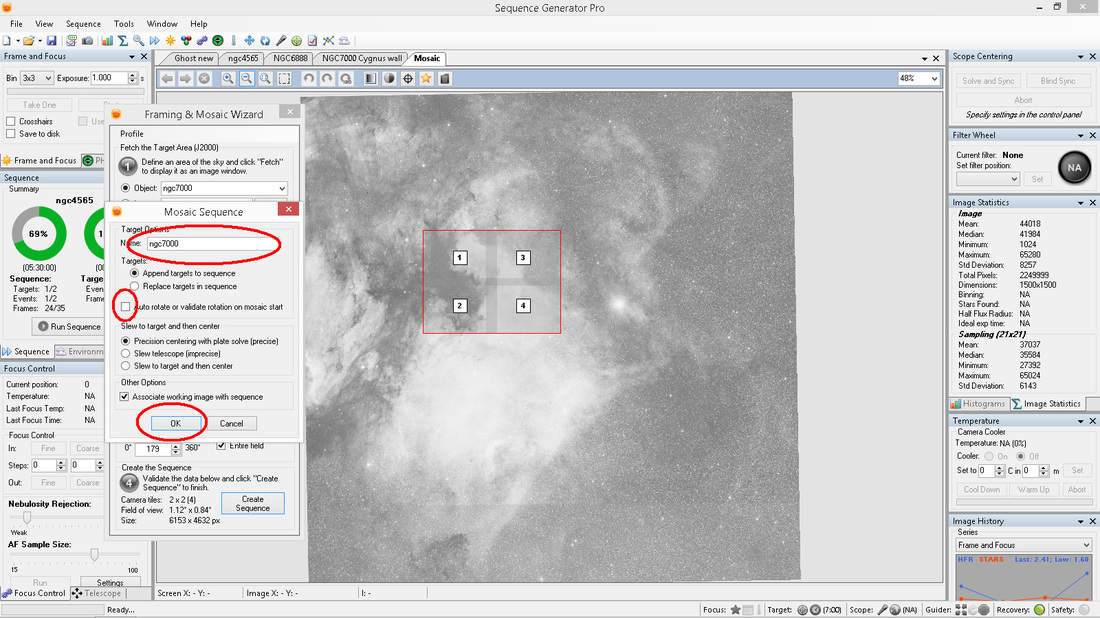
You can change the name of your target. If you have used an Astrobin link, for example, then that will be the name in there.
I always ensure that I have the Auto rotate or validate rotation on mosaic start unticked. If you don’t and you are not using an auto rotator then this will stop the sequence from working correctly.
I also want to associate this target with a sequence.
Then press OK.
Step 5: Success
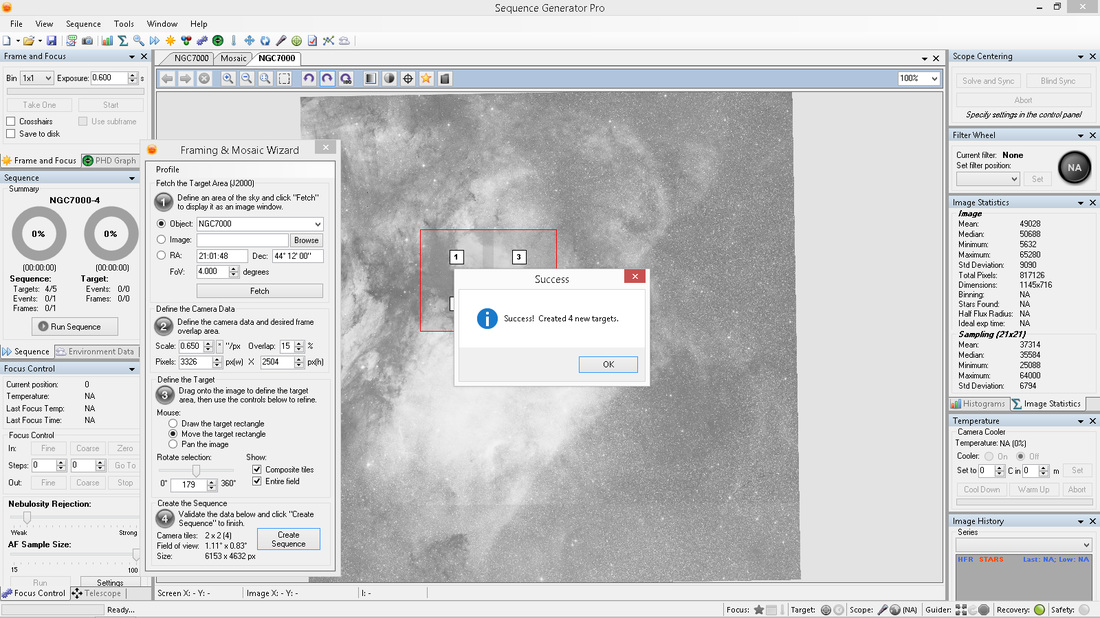
Click on the OK tab here and you will see just how successful this has been!
Step 6: Mosaic showing in your sequence
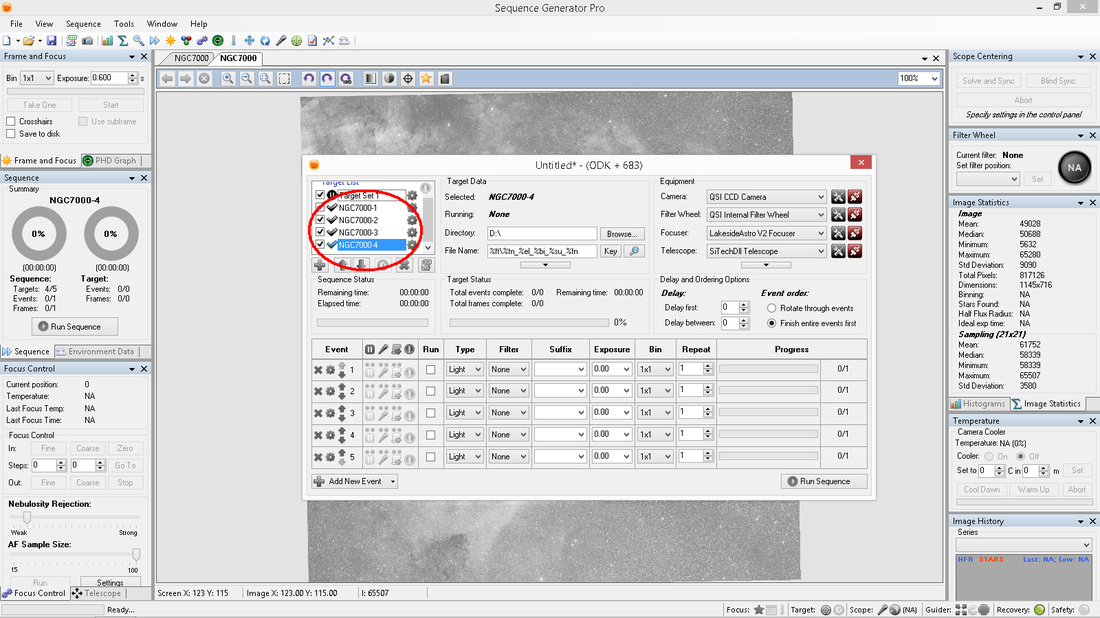
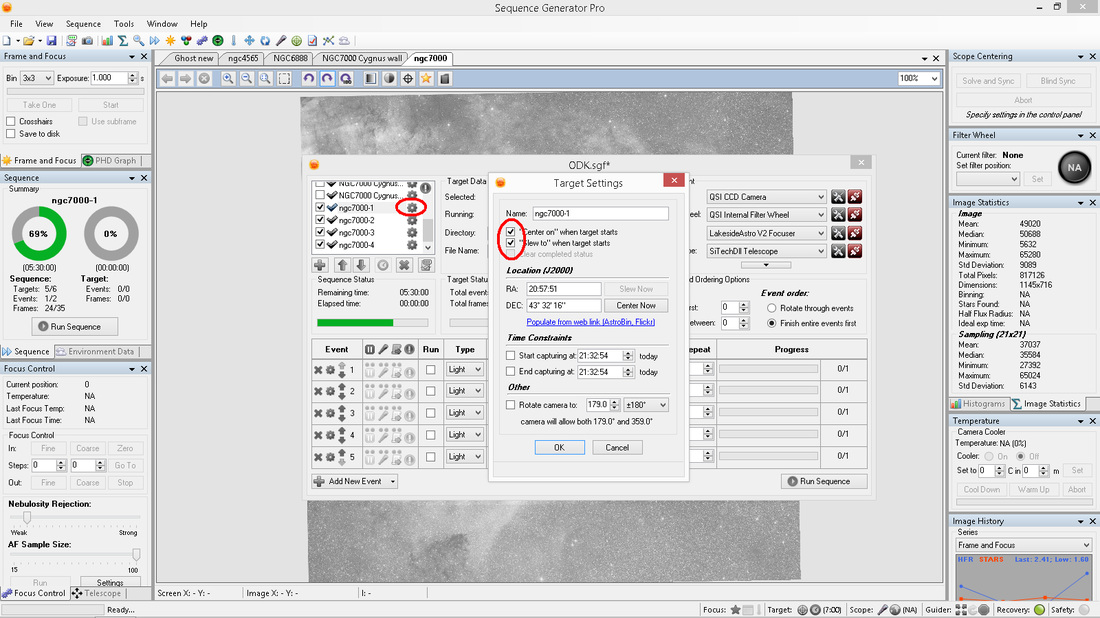
Your sequence has now been populated with the target panes in the targets window. You can see that it has put in 4 targets that correspond with the 4 mosaic panes for the entire target.
Ensure that when you click the cog to the right of the target, you have the “Slew to” when target starts and“Center on” when target starts boxes ticked as these will allow accurate plate solving to match the mosaic panes.
That's it!!!
Within the sequence you can either get all exposures done in the one pane and then SGPro will seamlessly move to the next pane, or you can set it to do one exposure from each frame in turn.
The F&M wizard makes easy work of mosaics and also framing of specific areas within a larger target. No more manual framing and taking exposures to try to determine that the image is just as you want it. Everything is automatically populated within the wizard and you can use your time to ensure that your data capture is as good as it can be. This can be used at any focal length and any type of scope. The sky’s your limit!

